Nodejs源码解读之 child_process 实现原理

在 Node.js 中,默认遵循单线程单进程模式,只有一个主线程执行所有操作。Node.js 擅长以事件驱动的方式处理 IO 等异步操作。但执行 CPU 密集型任务时,会阻塞主线程,后续操作都需要等待,此时可以通过 child_process 模块创建多个独立的子进程执行任务,多个子进程间可以共享内存空间,父子进程可以通过 IPC 通信。熟悉 shell 的同学,也可以使用它来做很多有意思的事情或工具,比如批量替换、增量部署等等。

child_process 模块

常用核心 API 有哪些?

创建异步进程

  • spawn(command[, args][, options])
  • execFile(file[, args][, options][, callback])
  • exec(command[, options][, callback])
  • fork(modulePath[, args][, options])

创建同步进程(Node.js 事件循环会被阻塞,直到衍生的进程完成退出)

  • spawnSync(command[, args][, options])
  • execFileSync(file[, args][, options])
  • execSync(command[, options])

各参数介绍(详见 Node.js 文档)

  • command: 只执行的命令
  • file: 要运行的可执行文件的名称或路径
  • args: 参数列表,可输入多的参数
  • options: 环境变量对象

其中环境变量对象包括 7 个属性:

  • cwd: 子进程的当前工作目录
  • env: 环境变量键值对
  • stdio: 子进程 stdio 配置
  • customFds: 作为子进程 stdio 使用的文件标示符
  • detached: 进程组的主控制
  • uid: 用户进程的 ID.
  • gid: 进程组的 ID.

你了解 child_process 模块的内部构造和 API 实现原理吗?

以下为 child_process 核心 API 的调用栈关系图

通过以上调用关系,可以看出底层实现为 process_wrap、spawn_sync 等 C++

js 外部模块中 spawn 和 spawnSync 的简化实现

lib/child_process 中,是如何实现 spawn 和 spawnSync 的呢,通过以下简化源码可以看出,这两个函数的实现存在一个相同的步骤:

  1. 标准化参数配置,包括参数默认值、属性合法性校验和处理等等
  2. 调用底层 Node API 提供的函数,并传入(1)中标准化后的配置项
  3. 返回执行体或者执行结果
1
2
3
4
5
6
7
8
9
10
11
12
13
14
15
16
17
18
19
20
function spawn(file, args, options) {
options = normalizeSpawnArguments(file, args, options);

const child = new ChildProcess();
child.spawn(options);

return child;
}

function spawnSync(file, args, options) {
options = {
maxBuffer: MAX_BUFFER,
...normalizeSpawnArguments(file, args, options)
};

// to do something validate or get properties of optionns
// ...

return child_process.spawnSync(options);
}

源码详见 child_process.js

js 内部模块中 spawn 和 spawnSync 是如何实现

lib/internal/child_process 中, spawnSync 的实现较为简单直接,调用已经加载的 NodeAPI spawn_sync.spawn 即可。

1
2
3
4
5
6
7
8
9
10
function spawnSync(options) {
const result = spawn_sync.spawn(options);

// to do something ...
// handle result.output encoding
// handle result.stdout, result.stderr
// handle result.error

return result;
}

ChildProcess 类的实现

ChildProcess.prototype.spawn 相对复杂些,我们慢慢拆解来看。

在了解原型函数 ChildProcess.prototype.spawn 之前,先来认识一下 ChildProcess 这个对象,他通过原型继承的方式,继承了 EventEmitterlibs/events.js, Node 中事件机制实现的基类,十分重要,十分高频,十分有用,但这里不扩展介绍,哈哈哈~

说道这里,一起看看这个类吧 ChildProcess

1
2
3
4
5
6
7
8
9
10
11
12
13
14
15
16
17
18
19
20
21
22
23
24
25
26
27
28
29
30
31
32
33
34
35
36
37
38
39
40
41
42
43
44
45
46
47
48

function ChildProcess() {
EventEmitter.call(this);

// 声明属性或赋默认值, 比如 this.connected = false;
// 相关属性: _closesNeeded, _closesGot, connected,signalCode, exitCode, killed, spawnfile

// _handle 属性是 process_wrap.Process 类的一个实例
this._handle = new Process();

// 生成唯一性标识,并保存 this
this._handle[owner_symbol] = this;

// 进程退出相关处理,包括销毁输出输出流,为事件循环发送退出信号,emit退出或错误信息,进行通信,销毁 Process 实例等。
this._handle.onexit = (exitCode, signalCode) => {
// change internal properties
// ...

if (this.stdin) {
this.stdin.destroy();
}

this._handle.close();
this._handle = null;

// if else for emit error or exit signal
// ...

// 检查进程是否已退出,并 emit close 信号,表示已退出
maybeClose(this);
};
}
Object.setPrototypeOf(ChildProcess.prototype, EventEmitter.prototype);
Object.setPrototypeOf(ChildProcess, EventEmitter);


ChildProcess.prototype.spawn = function(options) {
// ...
const err = this._handle.spawn(options);
// ...
return err;
}


ChildProcess.prototype.kill = function() {...}
ChildProcess.prototype.ref = function() {...}
ChildProcess.prototype.unref = function() {...}
// ...

除了 ChildProcess.prototype.spawn 外,还有 kill, ref, unref 等原型函数设置,其本质还是封装调用 this._handle 上对应的 kill, ref, unref 函数,将这些内部方法暴露给 ChildProcess 的实例,这里不再做过多介绍。

ChildProcess 的原型函数 spawn 都干了什么

了解过 ChildProcess 类后,你大概已经有些明白了,child_process 中大部分核心处理都依赖与一个 C++ 模块 process_wrapProcess 类的实例 this._handle, 它是 ChildProcess 的一个内部属性。

同理 ChildProcess.prototype.spawn 也是如此,来具体看下它做了哪些事情。

1
2
3
4
5
6
7
8
9
10
11
12
13
14
15
16
17
18
19
20
21
22
23
24
25
26
27
ChildProcess.prototype.spawn = function(options) {
// 处理 options 以及准备后面将使用到的数据,比如:👇
let stdio = options.stdio || "pipe";
stdio = getValidStdio(stdio, false);
const ipc = stdio.ipc;
// ...

// 调用 process_wrap.Process 类的 public 函数 spawn
const err = this._handle.spawn(options);

// 错误相关处理,如果可以 hit 到运行时错误,则 emit err, 否则 throw err
if (isRunTimeError) {
this._handle.onexit(err);
} else {
this._handle.close();
this._handle = null;
throw err;
}

// 流数据处理,将套接字socket装载到 this.stdio 中,用于建立通信通道以及其他流处理
// ...

// Add .send() method and start listening for IPC data
if (ipc !== undefined) setupChannel(this, ipc);

return err;
};

整体结构还是比较简单的,依次分为几个部分:

  1. 处理和校验 options,并为流处理做准备
  2. 调用 Process 类的 public 函数 spawn,得到错误
  3. 判断错误类型作相应的处理,具体是运行时错误,emit err, 否则 throw err
  4. 处理 stdio 中的 pipe、ignore、wrap 等类型的 stream
  5. 处理 stdio,具体指将仍存活的 socket 赋给 ChildProcess 内部属性 stdin,stdout,stderr
  6. 如果存在 ipc,则监听 ipc 数据进行相应的通信处理
  7. 返回错误

看到这里,其实 JS 作为女主的这台舞剧就基本结束了,但这个结局显然不容易被接受。

所以接下来一起来看看,那个隐藏在幕后为她一直奉献的男人,C++,CC 导演是如何运筹帷幕,掌控全局的吧。

源码详见 child_process.js

JS 是如何与 Node API 交互的呢?

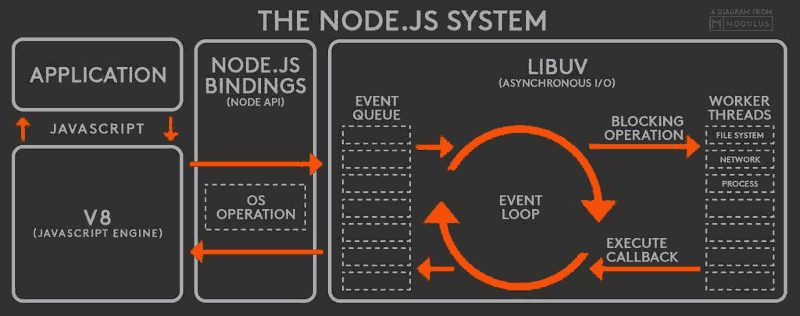
简单说下 Node.js 的基础架构

  1. V8 引擎解析 JavaScript 脚本。

  2. 解析后的代码,调用 Node API。

  3. libuv 库负责 Node API 的执行。它将不同的任务分配给不同的线程,形成一个 Event Loop(事件循环),以异步的方式将任务的执行结果返回给 V8 引擎。

  4. V8 引擎再将结果返回给用户。如下图。

通过 internalBinding 调用 getInternalBinding 加载器

在 child_process 源码开头位置,可以看到这两段代码。

1
2
const { Process } = internalBinding("process_wrap");
const spawn_sync = internalBinding("spawn_sync");

看着好像有点眼熟,代码兄 die,咱们是不是在哪见过?

1
2
3
4
5
6
7
8
9
10
11
12
function spawnSync(options) {
const result = spawn_sync.spawn(options);
// ...

return result;
}

function ChildProcess() {
// ...
this._handle = new Process();
// ...
}

看到上面 👆 这两段,脑电波似乎有了一瞬间的连通~,难道说 internalBinding 就是 C++ 与 JS 传递情书 💌 的信使 🕊 吗?

是不是信使不清楚,但是 internalBinding 对于加载 Node API 确实起到了关键的作用,来看看他的实现。

1
2
3
4
5
6
7
8
9
10
11
12
13
14
15
16
17
// internalBinding():
// the private internal C++ binding loader, inaccessible from user land because they are only available from NativeModule.require()
// These C++ bindings are created using NODE_MODULE_CONTEXT_AWARE_INTERNAL() and have their nm_flags set to NM_F_INTERNAL.

let internalBinding;
{
const bindingObj = Object.create(null);
// eslint-disable-next-line no-global-assign
internalBinding = function internalBinding(module) {
let mod = bindingObj[module];
if (typeof mod !== "object") {
mod = bindingObj[module] = getInternalBinding(module);
moduleLoadList.push(`Internal Binding ${module}`);
}
return mod;
};
}

👆 函数的关键在于 getInternalBinding 的调用,按图索骥,但这个函数的实现,在 js 文件中没找到?不用担心,接着看下去。

源码详见 loaders.js

全局函数 getInternalBinding 调用原生模块

在 node.cc 文件中 BootstrapInternalLoaders 函数执行会把 GetInternalBinding 函数设置为一个名为 getInternalBinding 的 JS 的全局环境上

1
2
3
4
5
6
7
8
9
10
11
12
13
14
15
16
17
18

// GetInternalBinding in node_binding.cc
void GetInternalBinding(const FunctionCallbackInfo<Value>& args) {
Environment* env = Environment::GetCurrent(args);

CHECK(args[0]->IsString());

Local<String> module = args[0].As<String>();
node::Utf8Value module_v(env->isolate(), module);
Local<Object> exports;

node_module* mod = get_internal_module(*module_v); // get the module

// if else for exports = something
// ...

args.GetReturnValue().Set(exports); // set module exports
}

通过 👆 的函数,我们可以想到 internalBinding('module') 其实是通过 get_internal_module 来获取到对应的原生模块,接着看下 get_internal_module 这个函数。

1
2
3
4
5
6

// get_internal_module in node_binding.cc

node_module* get_internal_module(const char* name) {
return FindModule(modlist_internal, name, NM_F_INTERNAL);
}

很明显,get_internal_module 内部调用了 FindModule 方法,并且在
modlist_internal 这个链表上,通过模块名 name 去寻找我们想要的模块。

1
2
3
4
5
6
7
8
9
10
11
12
13
14
15
16

// FindModule in node_binding.cc

inline struct node_module* FindModule(struct node_module* list,
const char* name,
int flag) {
struct node_module* mp;

// find the module by name
for (mp = list; mp != nullptr; mp = mp->nm_link) {
if (strcmp(mp->nm_modname, name) == 0) break;
}

CHECK(mp == nullptr || (mp->nm_flags & flag) != 0);
return mp;
}

FindModule 做的事情就是 for 循环找到我们想要的原生模块,然后返回。

看到这里,似乎找到了源头,但又感觉少了些什么。

是的,你的直觉没有错,确实遗漏了些东西。 相信机智的你已经意识到了几个问题。

  • 什么是原生模块?
  • modlist_internal 这个链表是从哪里来的?
  • 为啥它会包含我们要寻找的模块呢?

为了方便后续理解,这里 👇 我们先来解答上面的问题。

原生模块介绍

原生模块被存在一个链表中,原生模块的定义为

1
2
3
4
5
6
7
8
9
10
11
12
13
14
15
16
17
18
19

struct node_module {
// 表示node的ABI版本号,node本身导出的符号极少,所以变更基本上由v8、libuv等依赖引起
// 引入模块时,node会检查ABI版本号
// 这货基本跟v8对应的Chrome版本号一样
int nm_version;
// 暂时只有NM_F_BUILTIN和0俩玩意
unsigned int nm_flags;
// 存动态链接库的句柄
void* nm_dso_handle;
const char* nm_filename;
// 下面俩函数指针,一个模块只会有一个,用于初始化模块
node::addon_register_func nm_register_func;
// 这货是那种支持多实例的原生模块,不过扩展写成这个也无法支持原生模块
node::addon_context_register_func nm_context_register_func;
const char* nm_modname;
void* nm_priv;
struct node_module* nm_link;
};

原生模块被分为了三种,内建(builtint)、扩展(addon)、已链接的扩展(linked)

  • 内建(builtint):Node.js 的原生 C++模块
  • 扩展(addon): 用 require 来进行引入的模块
  • 已链接的扩展(linked):非 Node 原生模块,但是链接到了 node 可执行文件上

所有原生模块的加载均使用 extern "C" void node_module_register(void* m) 函数,而这里的 m 参数就是上面 node_module 结构体,不过 node_module 被放在了 node 这个 namespace 中,所以只能设置为 void\*, 函数的实现很简单:

1
2
3
4
5
6
7
8
9
10
11
12
13
14
15
16
17

extern "C" void node_module_register(void* m) {
// 通过 reinterpret_cast 强制类型转换
struct node_module* mp = reinterpret_cast<struct node_module*>(m);

// node实例创建之前注册的模块挂对应链表上
if (mp->nm_flags & NM_F_INTERNAL) {
mp->nm_link = modlist_internal;
modlist_internal = mp;
} else if (!node_is_initialized) {
// set mp to something
// ...
} else {
// set mp to something
// ...
}
}

看到上面 👆 这个函数,我们大概明白了,原来是通过 node_module_register 函数会将 C/C++ 模块 node_module 加入到 modlist_internal 链表中,供 get_internal_module() 使用。

C/C++知识 QAQ:
问:extern "C" 这个声明是干啥用的呢?
答:extern 是用来标明被修饰目标,即函数和全局变量,的作用范围(可见性)的关键字,使其修饰的目标可以在本模块或其它模块中使用,与 static 关键字作用正好相反。而 extern "C" 是为了实现 C++ 与 C 及其它语言的混合编程。

源码详见 node_binding.cc

那么继而产生了一个疑问,node_module_register 是在哪里调用的呢?

随意搜索一下,可以看到有 3 个文件, node_api.ccnode_binding.hnode.h,都调用了 node_module_register

除了 node_api.cc 外,其他都是头文件中,通过宏定义来调用。

我们瞅瞅 node_api.cc 里的 napi_module_register 函数,发现它将 Node_Api_Module 转换成 node_module,然后调用了 node 这个 namespace 下的 node_module_register,将 mod 重生后的 nm 添加到链表上。

1
2
3
4
5
6
7
8
9
10
11
12
13
14
15
16

// Registers a NAPI module.
void napi_module_register(napi_module* mod) {
node::node_module* nm = new node::node_module {
-1,
mod->nm_flags | NM_F_DELETEME,
nullptr,
mod->nm_filename,
nullptr,
napi_module_register_cb,
mod->nm_modname,
mod, // priv
nullptr,
};
node::node_module_register(nm);
}

继续追本溯源,napi_module_register 是哪里调用的呢?

经过一番搜查后,相信胆大心细的你又 track 到 node_api.h 头文件上了。

什么情况?怎么这个也是头文件?

回想下,我们之前 track node_module_register 函数的时候,最后也是一路走到了头文件。

仔细观察会发现在 node_api.h 头文件中,napi_module_register 函数会被 NAPI_MODULE_X 这个有参宏被预处理编译时被调用。而且会在预处理编译时被导出。

其实对于 node_module_register 被调用的头文件 node.h也是类似的。

1
2
3
4
5
6
7
8
9
10
11
12
13
14
15
16
17
18
19
20
21

extern "C" NODE_EXTERN void node_module_register(void* mod);

#define NODE_MODULE_X(modname, regfunc, priv, flags)
extern "C" {
static node::node_module _module =
{
NODE_MODULE_VERSION,
flags,
NULL, /* NOLINT (readability/null_usage) */
__FILE__,
(node::addon_register_func) (regfunc),
NULL, /* NOLINT (readability/null_usage) */
NODE_STRINGIFY(modname),
priv,
NULL /* NOLINT (readability/null_usage) */
};
NODE_C_CTOR(_register_ ## modname) {
node_module_register(&_module);
}
}

node_module_register 函数会被 NODE_MODULE_X 这个有参宏被预处理编译时被调用。而且也会在预处理编译时被导出。

小结:在 C++文件编译预处理后,所有原生模块会 node_module_register,添加到链表上,实现了原生模块的注册,默默的等待着前方 JS 小姐姐的 require 哦。

C/C++ 语言相关知识请参考:宏定义

源码详见 node_api.cc

深入了解原生模块

spawn_sync 实现原理

spawn_sync 模块初始化

1
2
3

NODE_MODULE_CONTEXT_AWARE_INTERNAL(spawn_sync,
node::SyncProcessRunner::Initialize)

通过 NODE_MODULE_CONTEXT_AWARE_INTERNAL 宏定义,在编译期调用 Initialize 函数,看下 👇 这个初始化函数做了什么事。

绑定当前环境变量下 Spawn 函数

1
2
3
4
5
6
7
8

void SyncProcessRunner::Initialize(Local<Object> target,
Local<Value> unused,
Local<Context> context,
void* priv) {
Environment* env = Environment::GetCurrent(context);
env->SetMethod(target, "spawn", Spawn);
}

Initialize 函数很简单,就 2 行代码,先获取当前的环境,然后把 Spawn 函数绑定到当前环境(JS 作用域)上,并且以 spawn 作为函数名,那么 Spawn 函数就是重点了,接着往下看。

声明 SyncProcessRunner 实例,执行 Run 方法,返回结果

1
2
3
4
5
6
7
8
9

void SyncProcessRunner::Spawn(const FunctionCallbackInfo<Value>& args) {
Environment* env = Environment::GetCurrent(args);
env->PrintSyncTrace();
SyncProcessRunner p(env);
Local<Value> result;
if (!p.Run(args[0]).ToLocal(&result)) return;
args.GetReturnValue().Set(result);
}

Spawn 函数其实也比较好理解,先获取当前环境,然后声明 SyncProcessRunner 实例 p 和本地变量 result,执行 Run 方法,如果结果不存在,则停止函数继续执行,否则返回结果。

请继续看 Run 函数做了哪些事。

Run 函数通过调用 libuv 的 API 执行,得到结果并返回

1
2
3
4
5
6
7
8
9
10
11
12
13
14
15
16

MaybeLocal<Object> SyncProcessRunner::Run(Local<Value> options) {
EscapableHandleScope scope(env()->isolate());

// 检查实例生命周期是否已经初始化
CHECK_EQ(lifecycle_, kUninitialized);

// 执行事件循环
Maybe<bool> r = TryInitializeAndRunLoop(options);
CloseHandlesAndDeleteLoop();
if (r.IsNothing()) return MaybeLocal<Object>();

Local<Object> result = BuildResultObject();

return scope.Escape(result);
}

上述 Run 函数主要调用了三个函数,TryInitializeAndRunLoop,CloseHandlesAndDeleteLoop, BuildResultObject,他们作用分别是

  • TryInitializeAndRunLoop:初始化生命周期,新建 loop ,执行 uv_spawn 计算结果 r

  • CloseHandlesAndDeleteLoop:删除 loop,修改生命周期为 close

  • BuildResultObject:判断结果有值,就将执行结果转化为 js 对象

小结:看完 spawn_sync 模块的源码后,我们基本了解到 Node 原生模块基本是通过调用 libuv 的 API 来执行,由 libuv 内部的事件循环统一调度,得到结果并返回。

源码详见 spawn_sync.cc

process_wrap 实现原理

创建异步进程 API spawn 逻辑回顾

先简单回顾一下,child_processspawn 函数是通过调用 internal/child_processChildProcess 类的原型函数 ChildProcess.prototype.spawn 实现的,ChildProcess.prototype.spawn 中又调用了 this._handle.spawn

简化下过程为:
spawn <- ChildProcess.prototype.spawn <- this._handle.spawn

我们知道 this._handleChildProcess 类的内部函数,并且是一个 Process 类的实例,而 Process 类由 process_wrap 模块提供,所以应该不难看出 this._handle.spawn 方法,是 Process 类的一个原型函数。

想通上面 👆 这部分后,咱们再来看源码就一目了然了。

初始化 process_wrap 模块

首先通过 NODE_MODULE_CONTEXT_AWARE_INTERNAL 宏调用 Initialize 函数,进行初始化

1
2

NODE_MODULE_CONTEXT_AWARE_INTERNAL(process_wrap, node::ProcessWrap::Initialize)

ProcessWrap 类源码实现

其次剩余的部分是一个 ProcessWrap 类,主要有一个 Initialize 公开函数和多个私有函数

  • Initialize 完成了上面 Process 类原型函数 Process.prototype.spawn 的设置

  • Spawn 获取 options,通过调用 libuv 的 uv_spawn 执行 loop、options 等,返回结果

1
2
3
4
5
6
7
8
9
10
11
12
13
14
15
16
17
18
19
20
21
22
23
24
25
26
27
28
29
30
31
32
33
34
35
36
37
38
39
40
41
42
43
44
45
46
47
48
49
50
51
52
53
54
55
56
57
58
59
60
61
62
63
64
65
66
67
68
69
70
71
72
73
74
75
76
77
78
79
80
81
82
83
84
85
86
87
88

class ProcessWrap : public HandleWrap {
public:
static void Initialize(Local<Object> target,
Local<Value> unused,
Local<Context> context,
void* priv) {
Environment* env = Environment::GetCurrent(context);
Local<FunctionTemplate> constructor = env->NewFunctionTemplate(New);
constructor->InstanceTemplate()->SetInternalFieldCount(1);

// 定义对外暴露的类名 Process
Local<String> processString =
FIXED_ONE_BYTE_STRING(env->isolate(), "Process");
constructor->SetClassName(processString);

constructor->Inherit(HandleWrap::GetConstructorTemplate(env));

// 设置原型函数 Process.prototype.spawn,Process.prototype.kill
env->SetProtoMethod(constructor, "spawn", Spawn);
env->SetProtoMethod(constructor, "kill", Kill);

// 设置 ProcessWrap 暴露的类名和构造函数
target->Set(env->context(),
processString,
constructor->GetFunction(context).ToLocalChecked()).Check();
}

// to do something, for example
// set memory size of ProcessWrap
// ...

private:
// 私有构造函数
static void New(const FunctionCallbackInfo<Value>& args) {
// This constructor should not be exposed to public javascript.
// Therefore we assert that we are not trying to call this as a
// normal function.
CHECK(args.IsConstructCall());
Environment* env = Environment::GetCurrent(args);
new ProcessWrap(env, args.This());
}

ProcessWrap(Environment* env, Local<Object> object)
: HandleWrap(env,
object,
reinterpret_cast<uv_handle_t*>(&process_),
AsyncWrap::PROVIDER_PROCESSWRAP) {
MarkAsUninitialized();
}

// 这儿有一堆私有静态函数 StreamForWrap、ParseStdioOptions、Kill、OnExit

static void Spawn(const FunctionCallbackInfo<Value>& args) {
Environment* env = Environment::GetCurrent(args);
Local<Context> context = env->context();
ProcessWrap* wrap;
ASSIGN_OR_RETURN_UNWRAP(&wrap, args.Holder());

Local<Object> js_options =
args[0]->ToObject(env->context()).ToLocalChecked();

uv_process_options_t options;
memset(&options, 0, sizeof(uv_process_options_t));

// to do something for set properties of options
// options.exit_cb
// options.uid
// options.gid
// options.file
// options.args
// options.cwd
// options.env
// options.stdio
// options.windowsHide
// options.windows_verbatim_arguments
// options.detached
// ...

// 与 spawn_sync 一样,调用 uv_spawn 执行命令
int err = uv_spawn(env->event_loop(), &wrap->process_, &options);

// to do something for 内存回收
// ...

args.GetReturnValue().Set(err);
}
};

源码详见 process_wrap.cc

简单介绍 libuv 的 uv_spawn 模块

uv_spawn 位于 deps/uv/src/unix/process.c 中的函数,是 libuv 库用来执行进程的一个方法。

uv_spawn 函数类型及参数如下:

1
2
3
int uv_spawn(uv_loop_t* loop,
uv_process_t* process,
const uv_process_options_t* options)

uv_spawnlibuv 源码里,相当常用的进程相关的函数,有 C 语言基础,对 libuv 感兴趣可以去了解下这个 Node 实现事件循环的库,限于篇幅这里不再扩展介绍。

源码详见 uv_spawn.c

总结

本文介绍了 child_process 模块常用 API 以及其调用关系,简单扩展了 Node_API 是如何加载的,原生模块是如何注册到链表的等等,并通过简化后的源码,刨根问底,一路追溯到 spawn_sync、process_wrap 这两个 C++ 原生模块的实现,即通过 Node_API 与 libuv 的调用和交互,以 uv_spawn 函数实现上层进程的执行,并返回执行结果。

看到这里,相信优秀的你已经对 child_process 实现原理、构造,以及[ js <-> Node_API <-> libuv ]之间的交互调用关系,有了更多的认识,接下来尝试自己解析下其他 Node 模块的源码实现吧~

1
2
3
4
5
6
7
8
const { spawn } = require("child_process");
const theTechArticle = spawn("technical_exchange");

theTechArticle.on("close", code => {
if (code !== "criticism") {
console.log(`本文到此结束,欢迎各位大佬交流指正~ O(∩_∩)O `);
}
});